Tuesday, January 29, 2008

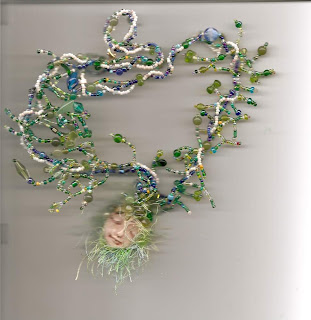
Green Goddess of protection necklace


This protection necklace has two faces: one of the green Goddess and one that is a mirror surrounded by beads and stones. When you feel the need for protection wear the mirror side out to reflect back any negativity and the Goddess close to your heart. It is made of polymer clay and stained. The necklace is of seed beads, stones, pearls, and fiber. It was really a fun one to make.
http://www.etsy.com/shop.php?user_id=5191681

Tuesday, January 22, 2008

Human finger bone earrings


Irene suggested the finger bone pendant needed earrings to match, so here they are.

Thursday, January 17, 2008

Native Maiden Pendant Focal Bead


I remembered a drawing I'd done of a beautiful African maiden and wanted to see how she would look as a focal pendant. here is the result. I made three, each similar but each also very different in color tone, background mat and background piece.
I drew the design onto a blended piece of polymer clay (black, a touch of red and a tiny bit of iridescent gold)using a ball stylus. Then I carved into the clay where I wanted deeper impressions, and carefully removed bits of excess clay. When I was happy with this stage I baked the pendant. When it had cooled I used irridescent powders to highlight certain areas. The eyes weere emphasized with polymer inks. The design was placed on the tore, carved, textured background pieces and baked again.
I hope you like her.See more at my Etsy shop http://www.etsy.com/shop.php?user_id=5191681
Suggestions?

Sunday, January 13, 2008

human finger pendant


Okay here's my latest. A finger pendant. Faux human finger to be worn by the brave (or tasteless?) hmm. Bet your neighbor doesn't have one!

Wednesday, January 9, 2008

Spark Book


From Home Made Simple, Organized Life, a great little organizer notebook you can make!

There are so many things that we experience, read or hear about in our daily lives that “spark” inspiration. We make promises to ourselves to remember these little details but as we get busy it’s easy to move on and forget, even with the best of intentions. What if you had a useful planning tool as your designated place to store and organize all those “sparks” of inspiration?

send this to a friend


A Different Kind of Planner

The Sparkbook is different from your typical planner because it not only helps you determine all those actions you want to take for the upcoming year, it helps you visualize these things.

By collecting sketches, magazine cutouts, photographs and bits of memorabilia from daily life along with key words, phrases and poetry, you can create a great reference for inspiration and empowerment.

Your Book

To make your own Sparkbook, designate a blank notebook or binder you have handy. Choose something that you know you’ll enjoy using and fits with your personal organization preferences.

Here are a few great examples of books to use:


3-ring binder with blank or lined paper
Small photo book (without the protective sheet covers)
Scrapbook (4”x 6” or 12”x 14”)
Sketch pad
Notebook

Next, you’ll want to figure out how you want to organize the book you choose. Adding tabs is an easy and clear way to keep your ideas, inspirations and plans in their own special categories. Here are a few thought-starters for possible tabbed sections, but feel free to add other categories or sections that are important and helpful to you.

Tab Section Ideas:

Home goals: Home décor and organization projects you’d like to accomplish.
Cooking/Entertaining: Recipes and dinner party ideas you want to remember.
Family: Activities and goals you’d like to achieve with your family.
Personal/wellness goals: Your health, spirit and personal thoughts.
Financial goals: Saving, budgeting and planning.
Travel /R&R: Places you’d like to visit in the next 12 months.
Career: Goals, plans and personal encouragement related to work.
You can also use these ideas as inspiration to create your own tabs if your book doesn’t already have them.

Creating Tabs:

Cut out swatches of fabric you enjoy and glue them to the sides of your pages. Write your section names on the swatches with a fabric marker.
Use color-coded rubber bands: section off and wrap rubber bands around each category.
Insert binder dividers with tabs, available at your local office supply store, to create sections.
Use colorful sticky notes and write sections names on a different color for each category.
Create your own bookmarks using ribbon and color code for each section for easy reference.
As you come across the inspirational and empowering sparks in your life, simply insert them into your sections as you see fit. Keep your journal somewhere handy, like on a bedside table to review and add to it throughout the year.

Create Your Own Organization

Creating fabric tabs and creative heading pages for your Sparkbook will help you organize and reference the things that ‘spark’ inspiration in your life.

Fabric Tabs


MATERIALS
Rectangles of fabric (4” x 1-1/4”)
Spray starch – heavy
Warm iron
Glue stick or double-sided tape
Scissors
Construction or scrapbooking paper
Permanent marker or fabric marker

INSTRUCTIONS


Cut enough fabric tabs (4” x 1-1/4” size) as needed for the categories you will have in your Sparkbook.
Fold each rectangle perfectly in half to create the finished size of 2”x 1-1/4”.
To make fabric sturdier, spray folded rectangle with heavy starch and press with a warm iron.
With your glue stick or double-sided tape, stick insides of rectangles together, leaving the last 1/4” of fabric unglued. This will be the portion of the fabric that attaches to your book pages.

Writing on Tabs:

Write category headings onto construction or scrapbooking paper that has been cut into pieces small enough to be glued to swatches to achieve the look as pictured.
Or write category headings directly onto fabric with a fabric marker.
Attaching Tabs:

Divide out the number of sections you want your book to have. (It’s easiest to have the tabbed pages be made up of 3 sheets glued together, with the center sheet being the one the tab is attached to.)
Use a glue stick to apply glue to the remaining 1/4” of the insides of your fabric tab. Attach to the edge of middle sheet of the three that will be glued together to make your ‘section-heading page’.
Once the tab dries, glue the back of the first of the three pages you’ve designated to the center sheet (which is now tabbed). Then apply glue to the front of the third sheet you’ve designated to the tabbed sheet as well. This will give you a sturdy ‘section heading page’ and will create a little more division between sections.
Follow the same process for each tab, moving the tabs down the right side of your book, alternating colors as you go.
Heading Pages

Now that your tabs are in order, you can personalize your heading pages. Heading pages can be as simple as just writing down the name of the section at the top of the page or as creative as adding imagery and phrases that will inspire you to fill up the pages of each section.


To add the inspiration pages, draw pictures or cut out words and imagery from magazines that speak to you. Add personal photographs and bits of memorabilia from your daily life and combine with key words or poetry to reference throughout the coming year.


If you like this article, you might also like:

Free Up Time Through Organization
Organizing Your Recipes
Fresh New Clean

Monday, January 7, 2008

Katie's Beading Blog

I love this necklace! I love Katie's style. Bet you will too.


Dreams of Topaz


browse necklaces

click to enlarge Designed by Katie Hacker
Materials
17 champagne 1-hole CZ-Gem Dropz in assorted shapes and sizes
4 ½-yards of .006” white Dandyline beading thread
3 dark brown transparent rainbow10g packs of 11/0 Toho seed beads
2 gold beading cones
1 gold lobster clasp
8” length of 22-gauge gold ColourCraft wire
Tools
Spin-N-Bead with bent-tip Big Eye needle
Flexible beading needle
Beading scissors
Round-Nose pliers
Wire Nippers
Jeweler’s Cement


Instructions
Finished Size= 26” with dangles
Note: Use the Spin-n-Bead to string seed bead sections. When threading back through beads to create the beaded dangles, use a straight flexible beading needle. You’ll have lots of leftover beads but it’s easiest to string beads quickly when the the Spin-N-Bead is full.
Cut the thread into three equal lengths and attach a stopper bead 3” from the end of each thread.
First strand: string 6” of seed beads. Pass the needle through a CZ-Gem Dropz and back through 2 ½” of seed beads. String 4” of seed beads. Pass the needle through a CZ-Gem Dropz and back through 2 1/2” of seed beads; repeat five more times. String 3 ½” of seed beads and a stopper bead.
Second strand: string 7” of seed beads. Pass the needle through a CZ-Gem Dropz and back through 1 ½” of seed beads. String 3” of seed beads. Pass the needle through a CZ-Gem Dropz and back through 1 ½” of seed beads, repeat three more times. String 5 ½” of seed beads.
Third strand: string 7” of seed beads. Pass the needle through a CZ-Gem Dropz and back through 4” of seed beads; repeat four more times. String 3” of seed beads.
Cut the ColourCraft wire length in half.
Make a wrapped loop on one end of the wire.
Remove the stopper beads from one end of each beaded thread and tie them to the wrapped wire loop. Place a drop of jeweler’s cement on the knot and cut off any extra threads.
Place the wire end through the wide end of the beading cone and make another wrapped loop on the other side of the cone to attach half of the clasp.
Repeat Steps 6-8 for the other end of the necklace.


Site Map | Contact | About Us
Copyright 2007 Beadalon

Sunday, January 6, 2008

Digital Picture Frame and trunk shows

This article sounded like such a good idea I had to share it with you. If you are a bead artist I strongly suggest you join Art Bead Scene and subscribe to their newsletter. Lots of valuable information comes your way regularly. http://artbeadscene.blogspot.com/

Art Bead Scene Blog


Celebrating art beads, inspiring those who use them.

Saturday, January 5, 2008

I Love Tools, Digital Picture Frame

For Christmas my husband gave me a digital picture frame. Not only will this be wonderful to have displayed in our home but his suggestion was to use it at trunk shows also. Genius! I had not even thought of that, but once the idea was planted I knew I wanted to share it with our Art Bead Scene readers.

My plan is to use a separate memory card that I can load my bead pictures onto - keeping just family pictures stored on the actual device. Then when I do a trunk show I can just pop that card in - ready to go instantly. I'm thinking this will be an effective marketing tool for a variety of reasons. First, having a great deal of printed pictures displayed starts to get visually cluttered and distracting. Second, the lighted digital display can show off important small details without having to worry about room lighting or glare. Third, the time difference it will take to set up that one frame vs. about 30 pictures is huge and time is always an issue with me. Finally, just the novelty of it will get people to stop and look.

I think that I'll have photo album of some sort nearby so people can then go directly to the picture they'd like to see. I can pause my digital photo frame, but I don't think I'd want just anyone playing around with the buttons. I'll still display a few prominent pictures around the area, but not so many smaller / easy to overlook ones.

What beady gifts would you like to share with us? Leave a comment - Thanks!